SETTING UP PROXMOX ON A NOTEBOOK
I have been experimenting with KVM and LXD linux containers, but that requires some bootstraping that I consider tedious. For some time I have been hearing about Proxmox, which is a linux distro based on Debian with focus on virtualization. I have installed it on a spare notebook here at home, so to experiment with linux distributions, kubernetes and creating lab environments whenever needed. Here are some tips I collected and applied to my setup.
2023 January 5To allow proxmox to run fine on a notebook:
Turn off screen
- Edit grub (
/etc/default/grub) to turn off the screen after 5 minutes:
GRUB_CMDLINE_LINUX="consoleblank=300"
- Then, run:
update-grub
Do not suspend/hibernate
- With systemd, mask the following systemd targets:
sudo systemctl mask sleep.target suspend.target hibernate.target hybrid-sleep.target
- Edit
/etc/systemd/logind.conf, and on options that start withHandleLidchange their values toignore. After finishing, restart systemd service:sudo systemctl restart systemd-logind
Add repo to receive minor version upgrades (e.g. 7.0 -> … -> 7.3)
This must be done just once, after installing proxmox. Then, run:
cd /etc/apt/sources.list.d && echo 'deb http://download.proxmox.com/debian/pve bookworm pve-no-subscription' > pve-no-subscription.list
QEMU guest agent (for Virtual Machines)
QEMU guest agent must be installed on the guest OS - it is great to exchange information between the host and guest, and to execute commands in the guest.
In Proxmox, it is useful to properly shutdown the guest and to freeze the guest file system when making a backup.
The package name, on Debian and Red Hat based distros, is: qemu-guest-agent .
In proxmox, go to the host, then on the menu choose “Options” (the same menu where you choose to enter the “Console”). There, enable “QEMU Guest Agent”.
After installing, enable the service on systemd: sudo systemctl enable qemu-guest-agent && sudo systemctl start qemu-guest-agent . Then, sudo poweroff the VM and start it through Proxmox.
Notes on Containers
QEMU when updated disrupts running VMs. For that reason, VMs can sometimes not be the best solution.
proxmox containers are LXC. They are more VM-like. The state is preserved.
Check available container templates (CT): proxmox menu -> datacenter -> local -> CT Templates -> Templates .
Update CT templates: login to the shell, then run:
pveam updateWhen creating a container, on the “Network” tab, on IPV4 and IPV6 it is better to select DHCP.
After creation, you can select the container you created and on the “Options” menu, choose to start at boot, etc…
“Unpriviledged containers” map their root user on the container to a no-root user account on the host. If some app(s) on the container do not behave as expected, change it on the “Options” menu to “No”.
By default a container’s user is generally root. So, after logged in as root, create a no-root user so that you can e.g. ssh into it from your network.
cloud-init is not supported on containers.
On ubuntu and its’ derivatives,
/etc/machine-idhas a unique ID that must be changed on the CT template -/var/lib/dbus-machine-idis a symlink to/etc/machine-id- that takes effect e.g. on the IP that a machine receives from the DHCP server (if not changed, we can have problems with dropping connections).To convert a container into a template: right click the container, and select “Convert to template”. Before that, make sure to do the following steps to prepare:
- Update the packages (apt update, dist-upgrade, clean and autoremove)
- Delete the ssh host keys:
$ sudo rm /etc/ssh/ssh_host_* - Purge the machine id:
$ sudo truncate -s 0 /etc/machine-id - Poweroff the machine:
$ sudo poweroff
To create a container from a template: right click the container template, and select “Clone”. There, make sure to set “Mode” to “Full Clone”. Then, start the container. ssh into the container to reset its ssh keys (example for debian-like distros below):
$ sudo rm /etc/ssh/ssh_host_*`  # delete the current keys (if they were not already deleted when you where preparing the container)
$ sudo dpkg-reconfigure openssh-server  # regenerate new keys
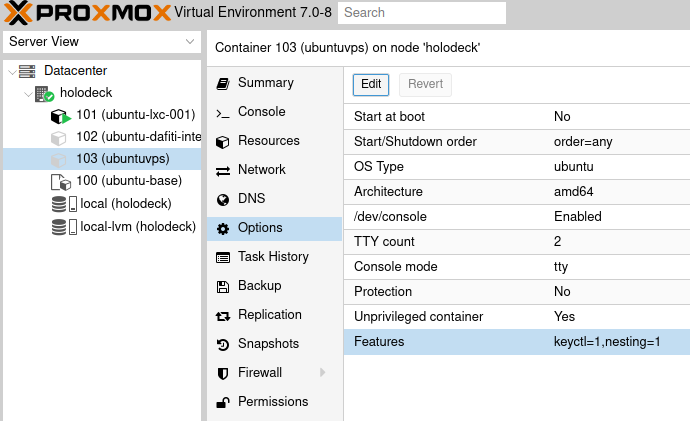
- Docker will not run on a container if you do not enable “nesting” and “keyctl”. You will have an error like the following:

Then, to enable “nesting” and “keyctl” on an LXC container, you must stop it and then configure like on the image below:

https://davenewman.tech/blog/install-proxmox-on-a-laptop/
https://www.tecmint.com/disable-suspend-and-hibernation-in-linux/
https://www.youtube.com/watch?v=xBUnV2rQ7do&list=PLT98CRl2KxKHnlbYhtABg6cF50bYa8Ulo
https://www.youtube.com/watch?v=79KiCBNbsbg
All copyright and intellectual property of each one belongs to its' original author.